With the late summer harvest in full swing, Common Ground’s kitchen is transforming ripe vegetables into foods we can store and use throughout the year. Since each season brings its own distinct bounty, our food preservation program runs nearly all year long. It requires a mix of good planning and on-the-spot creativity from our kitchen team and farm manager to turn the harvest into tasty foods that last. But you don’t need a commercial kitchen like ours, or a big team, to preserve the harvest. One example: At the end of this article, Assistant Chef Theresa Brooks shares a relish recipe with us that can transform just about any vegetables you have into a fast, tasty addition for many meals.
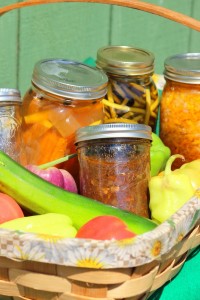 In your home, or at Common Ground, food preservation can be a great way to teach young people skills related to planning, safety, patience, math, and more. Students working on Common Ground’s kitchen crew play an important part in preserving the harvest — and learn through the process. Our student kitchen crew kicks off summer by turning the basil crop into Common Ground’s pesto supply. In the end, the crew produced and froze about twenty gallons of pesto and at least 30 gallons of greens. Preservation continues as crops arrive. Typically, Common Ground ends up with 10 gallons of pickled cucumbers, 30-50 quarts of other assorted pickled vegetables, and 3 gallons of relish and chutney.
As the school year begins, our kitchen staff is still at work preserving our many late summer vegetables—green beans, tomatoes, kale, collard greens, chard, and squash—using a blanch-and-freeze method. You can learn more about that and other freezing techniques from the USDA website.
One of the greatest – and most intimidating – preservation methods is canning. Pressure canning gives Common Ground lots of fantastic items, including jams, jellies, pickles and relishes. Here at the farm, we even make and can our own sauerkraut and kimchi. Assistant chef Theresa Brooks encourages students (and you) not to fear canning; anyone can do it with some basic guidance and a few simple supplies. The jars and rings are reusable, so only the tops need to be replaced each time you can. And if you want a leg up, home canning kits are available for purchase at many national chains. Learn about canning at Food Safety’s canning page.
This bounty of frozen and canned produce makes its way into the students’ farm meals throughout the school year. The hard work of our farmers and chefs produce the food that broadens the palettes, fuels the brains, and fills the bellies of our students, staff, and —we hope—yours as well.
RECIPE: Common Ground High School Relish, Branston Style
Note: Branston relish is actually a “name brand” relish. This relish is so popular that many people mistake it for a product rather than a company.
Ingredients
- 1 medium carrot, shredded
- 1 cup turnip, shredded
- 2 cloves garlic, minced (about 2 teaspoons)
- 1 cup eggplant, finely chopped
- 1 medium yellow onion, finely chopped
- 1 medium apple, finely chopped
- 1 medium zucchini, finely chopped
- 1 green bell pepper chopped
- 1 red pepper chopped
- 1/4 cup raisins
- 1/2 pound dark brown sugar
- 1 teaspoon salt
- 1/4 cup lemon juice,
- (optional) 1 minced hot pepper
- 3/4 cup malt vinegar (apple cider vinegar will do if you don’t have malt)
Equipment
- 1 large pot: Teflon lined, glass, or ceramic
- Large spoons and ladles
If you want to preserve:
- Half pint or pint jars
- Lids and rings
- Pressure canning system
Directions
Step 1 – Wash and chop
Wash the vegetables and fruits carefully, and then chop and shred finely. You can use a food processor to simplify.
Step 2 – Combine and bring to a low boil
Combine ALL of the above ingredients, EXCEPT for the vinegar. Cook down over low heat until all vegetation is soft. Watch closely. If liquid levels are low, add a little water to prevent burning while food softens.
Step 3 – Cover and simmer
Simmer covered for about 1.5 to 2 hours or until the turnip becomes soft. Remove from heat.
Step 4 – Stir in the remaining vinegar
Step 5 – Cover and move to the refrigerator. Refrigerate for 1-2 days to allow the flavor to develop.
Step 6 – Preserve
At this point, you can decide to move to a glass or plastic food storage container to store in the refrigerator. Here it will last for 2-4 weeks.
Or, if you are ready to take on canning, move to glass jars and commence canning. Canned relish can be shelved for months.
Or if you just can’t wait, crack it open, spread it on crackers and treat yourself to a tasting.
Our kitchen serves up a lot of great flavors. Leave a comment to tell us what recipes and tips would you like to see in the future!


Leave A Comment